- 1. Quick Tour: upCast in seven steps
- 2. Basic operations
- 2.1. Choosing an import filter
- 2.2. Configuring an import filter
- 2.3. Choosing the source file
- 2.4. Adding an Export Filter
- 2.5. Configuring an Export Filter
- 2.6. Removing an Export Filter
- 2.7. Choosing the destination folder
- 2.8. Specifying a separate destination folder for images
- 2.9. The conversion process
- 2.10. Aborting a running conversion
- 3. Working with Configurations
- 4. Logging
- 5. Magic Folders and Locations
If you don't read manuals, you should at least read this.
If you know what upCast does, upCast is already installed on your machine and you have a document file at hand, then using upCast is straightforward:
Start the application by double clicking its icon or select it in the menu (Windows only).
With the button for the source file (in the Import Settings pane), choose the document to be converted.
With the popup menu (in the Export Settings pane), select the output format you want to be created, then click to add the filter to the list of output filters.
With the destination button, choose the folder where you want upCast to put the generated output text file(s), with the images button, choose the folder where you want upCast to put the generated output image file(s).
Click .
Wait while upCast does its job.
Use the resulting file(s), for whatever you want.
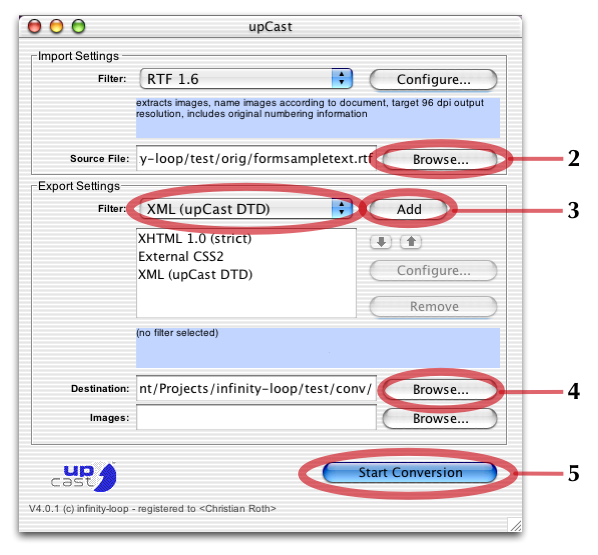
The following screenshot shows the graphical user interface of upCast. It is divided into two main areas, the Import Settings and the Export Settings pane. Corresponding numbers mark the steps as described in the Quick Tour (2: select the input file, 3: select the output formats, 4: select the output folders, 5: start the conversion).
This section describes basic operations for running upCast in GUI mode.
With the import filter popup, select the import filter you want to use. It is in effect immediately.
Clicking on the button next to the import filter selection popup, you will be presented with a configuration dialog that lets you set parameters specifically for the currently selected import filter. For a description of the available settings, see the Import Filter Reference section.
Click to use the settings you have made, or click instead to leave the current settings unchanged.
upCast shows the current configuration of a filter in plain human language in the shaded box below the import filter selection popup. This way, you can see at a glance how the currently active import filter is configured.
After choosing and configuring the import filter you need to choose the source file to be converted. This should be a valid document file appropriate for the selected import filter.
If the specified file is not a valid file, chances are that the conversion process does not succeed, though upCast tries hard to cope even with files not conforming to the RTF 1.6 specification.
Note
The RTF 1.6 Specification covers all MS Word versions up to and including Word 2000 and is fully compatible with Word 2003.
Clicking the button next to the Source File text field brings up a file chooser dialog which lets you navigate through the folder structure of your mounted hard drive(s) or volumes. Select the file you want to convert and close the dialog by clicking .
You can also directly type in the name and access path of the source file you want to convert.
In doing so, to separate folder names, you must use the forward slash ('/') on Unix and Macintosh systems. On Windows machines, use the backslash ('\') character instead. The slashes will be converted to the appropriate, system specific separator character during file access.
upCast provides several different export options, which are implemented in modules which we call (classes of) Export Filters.
For a single source file, it is possible to specify several (instances of) export filters simultaneously. These are stored and displayed in the export filters list and are processed in the order they are displayed, from top to bottom.
So, instead of choosing a single export filter, you add instances of export filters to the list of active export filters.
Choose the filter you wish to add from the export filter popup menu, then click . This will add an instance of that filter to the export filters list displayed below the popup.
You can add as many export filters as you like, even of the same class or type. This makes sense since each export filter may be configured individually and holds its own set of configuration parameters.
To change the order of already inserted and configured export filters, select it by clicking on its entry in the export filters list and use the and buttons to nudge it a position up or down.
Each export filter can have its own set of parameters that you can tweak to your liking.
To configure an export filter, select it in the export filters list (it will be highlighted) and click the button. This will present you with a dialog box specifically for that filter which lets you adjust its parameters.
If a filter does not have user-settable parameters, the button will be dimmed.
For a detailed description of the available parameters for each of the export filters included with upCast, see the export filter parameter reference.
upCast shows the configuration of the currently selected export filter in plain human language in the shaded box below the export filters list. This way, you can see at a glance how an export filter is configured, without having to open its configuration dialog.
Select the export filter to be removed in the list of active export filters (it will be highlighted), then click the button.
For safety reasons, you can remove export filters from the list only one at a time.
Next, choose the destination folder, i.e. the location where upCast will put all of its primary output files.
Clicking the button next to the Destination: input field brings up a folder chooser dialog which lets you navigate through the folder structure of your hard drive(s). Select the folder you want upCast to put its files into and close the dialog by clicking .
Note
The folder to be selected must be highlighted when you click .
You can also type in the path of the desired destination folder directly.
In doing so, to separate folder names, you must use the forward slash ('/') on Unix and Macintosh systems. On Windows machines, use the backslash ('\') character instead. The slashes will be converted to the appropriate, system specific separator character during file access.
If you want extracted images to be written into a specific folder, you can specify it here. All references to images in the exported XML and/or XHTML files will reference these images relative to the output destination folder, except for when the folder is on a different disk, partition or volume.
If you do not specify an image destination folder by leaving the field completely empty, upCast will put extracted images in the destination folder.
Clicking the button next to the Images input field brings up a folder chooser dialog which lets you navigate through the folder structure of your hard drive(s). Simply select the folder you want upCast to put image files into and close the dialog by clicking .
Note
The folder to be selected must be highlighted when you click .
You can also type in the path of the desired image destination folder directly.
In doing so, to separate folder names, you must use the forward slash ('/') on Unix and Macintosh systems. On Windows machines, use the backslash ('\') character instead. The slashes will be converted to the appropriate, system specific separator character during file access.
To start a conversion process, click the button.
The conversion process in upCast consists of several phases:
First, upCast reads and analyzes the source document you specified. The document is stored internally in an intermediate, unified format. Furthermore, during this first phase, the import filter converts and writes images as it finds them according to the settings you have specified in the import filter configuration dialog. Image elements will have their source attribute pointing to these files.
Then, all of the registered export filters (each of which makes up an additional step in the displayed progress bar) are called in order to carry out their task, one at a time. The first export filter on the list of active export filters (from top to bottom) is called first, then the second, and so on.
The progress window that is displayed during a conversion process provides a button. You can abort the conversion process at any time by clicking this button. If it is clicked during the export stage, all export filters' output that has already been successfully written at that point will remain untouched.
A configuration in upCast consists of all settings you can make via the GUI. It describes the current state of the application and comprises the following areas:
input filter selection
input filter configuration
current source file
export filters list
all configurations of the export filters in the export filters list
current destination folders
To save the current configuration of upCast to disk, choose from the menu. This brings up a file chooser dialog that lets you select the location and the name of the file where the configuration will be stored. Click on to actually save the configuration.
Important
For consistency reasons, you should make sure that the file name has the extension .plist.
To open or reload a configuration you had previously saved, choose from the menu. In the file chooser dialog presented, choose the configuration you want to open.
The preferences file preferences.plist, located in the {Preferences Folder}, is a special configuration file that is saved every time you quit upCast, and that is automatically restored whenever you start upCast.
For you, this means that the configuration of the upCast application is automatically preserved across single sessions.
This file is stored in the platform specific {Preferences Folder} folder.
upCast relies on the log4java™ logging framework. Describing the configuration of this system is beyond the scope of this manual; for details, see the log4java project website.
The default configuration of the system is:
# Set root logger level to INFO and its only appender to A1.
log4j.rootLogger=INFO, A1

# A1 is set to be a RollingFileAppender.
log4j.appender.A1=org.apache.log4j.RollingFileAppender

# A1 Set options.
log4j.appender.A1.MaxFileSize=256KB
log4j.appender.A1.MaxBackupIndex=5
log4j.appender.A1.File=${de.infinityloop.application.logfile}
log4j.appender.A1.layout=org.apache.log4j.PatternLayout
log4j.appender.A1.layout.ConversionPattern=%d{DATE} %X{ilInstance} %-5p %x - %m%n
As you can see, upCast defines the property de.infinityloop.application.logfile to hold the path to the log file to write to. This configuration file is found in the upCast distribution JAR at the following location: {JAR Resource Location Path}/config/log4j.properties. If you need or want to change the logging behaviour of the product, you need to change this file in the distribution JAR.
You'll probably want to change the default configuration when using upCast as a library in a custom application, where you want it to write to a specific log or a stream. You may do this e.g. programmatically using the log4java™ API, or you may intercept upCast's log output which will be available and interceptable at the Logger de.infinityloop.
Note
We recommend to remove the log4j.properties file completely when using upCast as a library and control logging completely from the host application's log4j configuration. When you remove the log4j.properties file from upcast.jar, upCast does not set up any logging.
To view the contents of the logfile select from the menu. This displays the current contents of the logfile in a new window at the time this window is opened.
If you want to save the contents of the logfile persistent to a different file, use the button at the bottom of the window.
Note
When you submit a bug report to infinity-loop or request technical support, please include the contents of the respective logfile along with the document itself in your eMail. This might be valuable information for our technical support staff to track down your problem and assist you in finding a solution.
upCast makes use of certain locations in the running machine's file system to store support and session information. These locations are different depending on the underlying native Operating System that runs the Java Virtual Machine. This manual denotes these "magic" places by placing the name of the location in curly braces, e.g. {Application Support Folder}. To learn the actual location on the machine upCast is running on, open the window, where the name as enclosed in the curly braces is listed with its corresponding file system location.
The following magic folders and locations are currently defined:
- {Application Support Folder}
The root folder for application support data.
- {Licenses Folder}
This folder contains installed licenses for the software. License files must end in .license to be recognized. If several licenses are valid for the application, it will show a list of them to choose from at startup time.
- {current license file}
This indicates the license file currently in effect.
- {JAR License Location Path}
This is the path in the distribution JAR where you may store a file named upcast.license. If this file exists at the specified location, it is used. If there are also license files in the {Licenses Folder}, a list will be displayed to choose from at application launch time.
- {Log File}
The path to the application's log file.
- {Encodings Folder}
The folder where custom encodings can be placed. For encodings to be recognized by the application, their file name must end in .encoding.
- {'stdfonts.config' File}
The stdfonts.config file currently in effect.
- {DTDs Folder}
The folder where the application copies its own DTD and where you should put any additional DTDs, each one in its own folder.
- {Application Preferences}
The folder where application preferences will be stored at quit time.
- {'preferences.plist' file}
The location of the preferences.plist file where current application configuration parameters are persistently stored when the application is quit and where these settings are restored from upon next launch.
- {Documentation Folder}
The root folder for application documentation data and related files.
- {documentation root file}
The file that is opened when the user chooses . By replacing the default file with a custom one at this location, you can provide custom help files or documentation for specific installations.
- {JAR Resource Location Path}
The root location in the application JAR where configuration files for the application are retrieved from.